nobis opus splendeat: we need more glitter

Posts tagged ‘green’

Infertility Awareness Week – Once Upon a Time Bolsters

Fertility yoga is a popular tool among those who suffer from infertility. It’s a way to calm your mind and try to unite your thoughts with your actions while thing you feel least like doing is being calm. By creating a safe space for your body full of support, you can let your mind relax a little bit.

I’ve taken several fertility yoga and restorative yoga classes over the past few years, and a common thread seems to be the “Goddess pose”. I’ve done it with one or two bolsters which you lay back on, letting the bolster support and cradle your body while you let the front of your body release. As someone who is constantly either at a computer or at a sewing machine, this pose feels like pure bliss at the end of the day. ANYWAYS, I was trying to figure out where to get my own bolsters for home practice and I found some 9″x22″ at fabric.com . Then my mind started racing with ideas on how to cover them!

I had some details that I wanted in the cover. I wanted a stiffer fabric, but something soft against the skin, so I instantly thought of a light linen canvas like Melody Miller’s Ruby Star Rising or Heather Ross’s Far Far Away II. I also wanted handles on the ends, a zipper up the side, and a flap with which to cover/hide the zipper… there are few things in this world that are LESS relaxing than a zipper poking into your back… or neck… or face.

So I had a general idea of what I wanted this cover to look like. I chose some Far Far Away II and tried to match up some colors. I ended up with this yellow rose fabric and this green sleeping beauty with an orange zipper.

The zipper is hidden behind a flap that just looks like a seam running the entire bolster... much softer than the metal head of a pointy zipper!

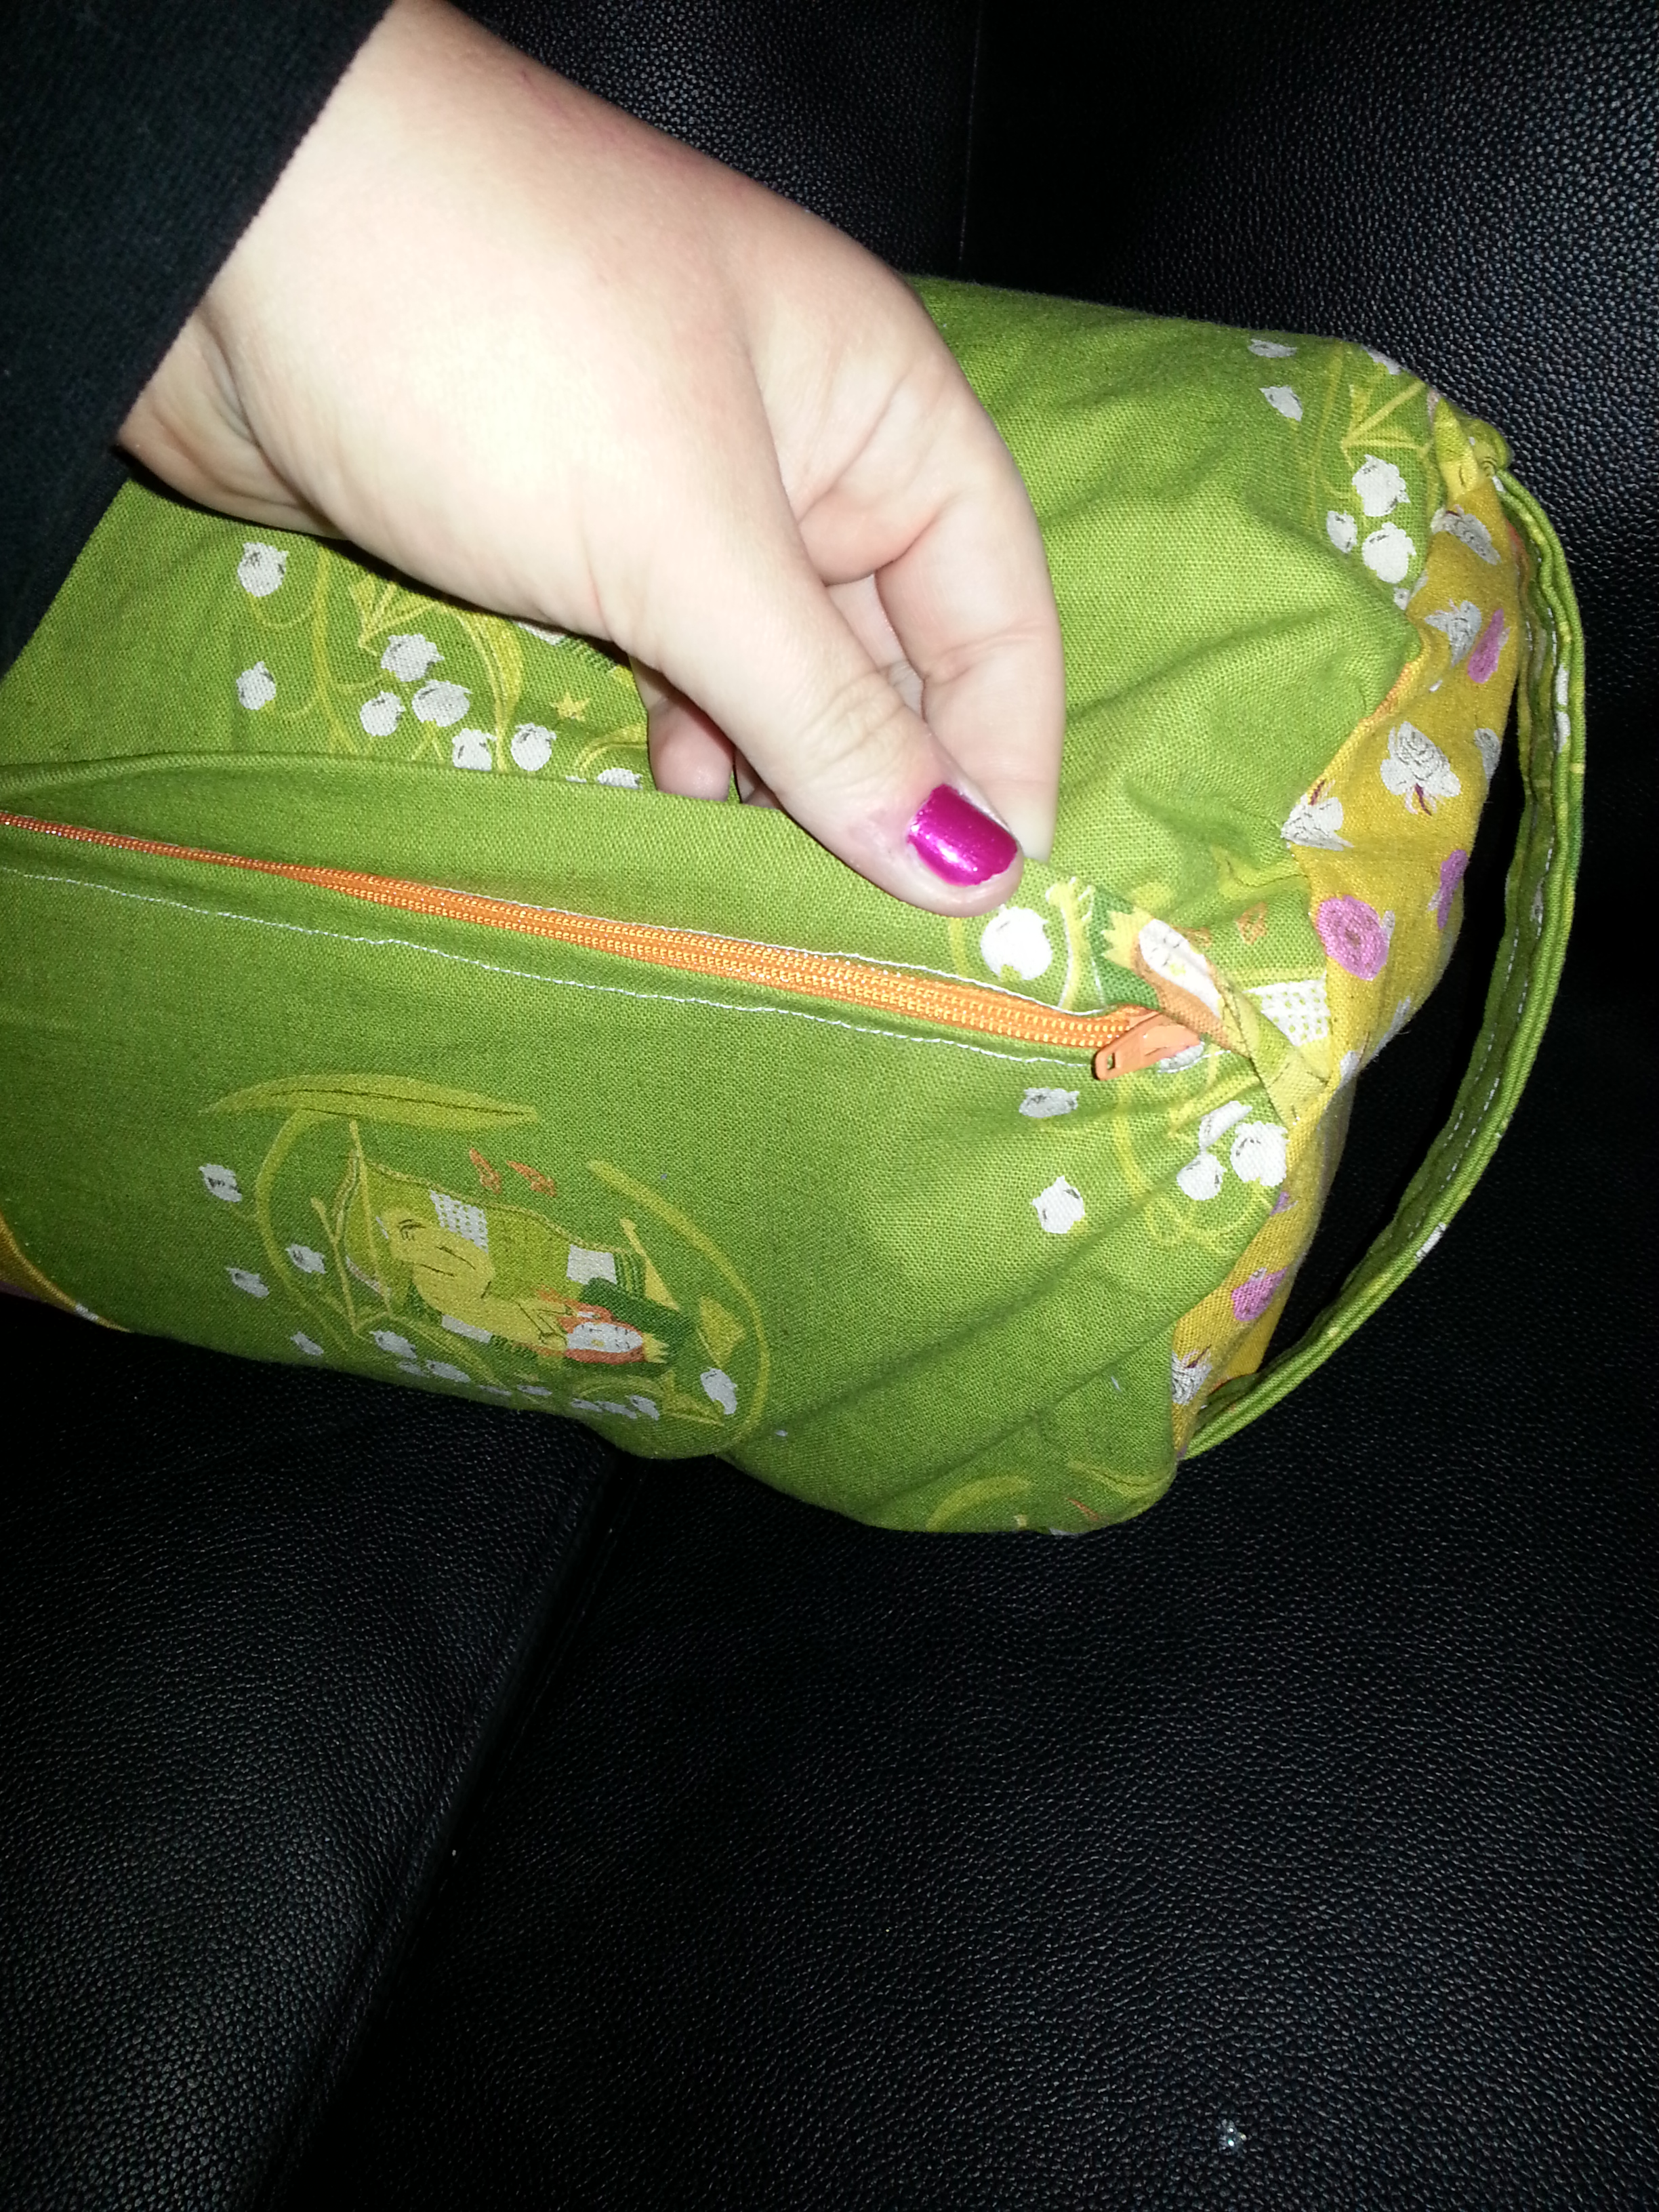
The zipper is hidden behind a flap that just looks like a seam running the entire bolster… much softer than the metal head of a pointy zipper!

The longest zipper I had was about 15″ or 16″ (which I’ve now rectified by ordering an assortment of 20″ & 22″ zippers but they haven’t been delivered yet), so I decided to put it at one end of the cover (not in the center) and have it open towards the center. I used the green as a base with a wide rose strip through the center, perpendicular to the opening.

Once I had a tube shape that sort of fit the pillow (with no pattern there’re a lot of “fittings” and “alterations” involved) I made two “handles” and two “end caps”… two strips and two circles. The first time I put it all together the zipper flap ended up being sewn down while pushed the wrong way rendering it completely useless… I didn’t make that mistake twice!

With a handle at each end, it's really easy to grab and reposition... even if your eyes are closed!

With a handle at each end, it’s really easy to grab and reposition… even if your eyes are closed!

Another problem I had was that the cover was too long and the circles (at 11″) were too big… but as my mom always says about haircuts, it’s easier to try to take more off than to try to put more on after the fact. But once I honed in on the right size I ended up with a beautiful and very comfortable bolster!

I just want to mention now that it’s Infertility Awareness Week this week. You can find out more about the disease of infertility, infertility etiquette, and what you can do to help at RESOLVE, or the Canadian support site IAAC (even though Canadian Infertility Awareness Week isn’t until May!)

christmas ninja part 4: bags to put things in

I started to realize that if I outlined every single thing that I made this xmas, I would be here until Easter, so I’m grouping widely, just let me know if you want me to slow down and show you something in more detail.

Exhibit 1: the tablet case.

Robot print on the outside, circuit board print on the inside, this beauty was intended for my dad’s tablet.  No velcro or clasps to scratch it up, there are magnets sewn into the inner faces.

In my defense, it fit my iPad with loads of room to spare in both dimensions.  Fluffy quilting make it soft padding for crashing into things, like dogs (my parents have 3 enormous siberian huskies).   How was I to know that his tablet is like 3 times thicker and an about 25% longer than an iPad?

V2:

By repositioning the magnet onto a little flap, I extended the reach of this baby by several inches. It can be closed either with the flap on the inside OR the outside of the body.

My cousin invited my family to her place for dinner… she said not to bring anything, but I wanted to bring something nice for her.  Enter flavored Schnapps… and pretty bag to put it in!

and looky inside!

And lastly, a bag all for me!  This is based on that cute little earbuds case… just bigger. Can you believe I got this stuff on super-duper clearance?  So cool.

It’s seriously neon green!

the christmas ninja part 1: the swap

This is the first of what is likely to be many ninja-ed gifts this year. We had a christmas party at work with an optional under-10-dollar gift exchange. I’m not really sure how much these cost to make, but if you count the fact that I charge out my time at a min of 50$ an hour, I think they’re worth about 200-300$ 😀  To be honest, I first decided to make them round because I wanted to use bias taping and have not yet mastered the art of corners. :S

I’m not sure why my phone camera is being so difficult… I might have to start using a real camera…

Do you recognize the fabric? When I bought fabric for the Christmas swap I think I bought a 1/2m of each so that I’d have some extra for christmas-y type things, that this is definitely one of those things.

These babies are insulated with insulbright and  triple-duty. First they have the obvious use being a place on which to set a hot pot. Second, they have nice little pockets so when you want to grab a pot, the tops and bottoms of your fingers are covered. Guess who always burns themselves by touching the outside of the stove?

Third, they can store a covered dish either for transport or just for keeping warm. In three different sizes, you could use one for each purpose!

minky… all the better to clip you with!

I had a request from the person that received these to do some more for a baby shower. The only instructions given were that the colors were green and brown, they didn’t know if it was a boy or a girl, and she liked the damask patterned one. Not a whole lot, but more than enough to get creative.

So I started searching around my stash for green and brown, everything green and brown i could find in any fabric, even if they didn’t go together or weren’t the same shades, even if it was just a scrap. I came up with about a dozen fabrics and carted them all to my sewing table (aka, “the kitchen table that hasn’t seen food in probably close to 2 years now”). I started laying them out, moving them around, pulling some, putting some other ones in, just visual brainstorming. I had the wonderful thought to make one side minky because I had some stringy minky scraps from cutting around blankets and bibs, and I hardly ever throw a scrap away. So here’s what I came up with:

Not too girly, not to boy-y (yes, it’s a word now), and hopefully sorta co-ordinate-y (again, now a word).

happy mochi yum yum!

It arrived!!! And it is just as beautiful as I hoped!

Thank you Monica Solorio-Snow for reading my mind 😀

viewer discretion is advised

This is a topic that could make men uneasy… scratch that, this is a topic that generally makes men run screaming. It has many names: “my best friend”, “my aunt Flo”, “that time of the month”, “a moon-week”… I was watching a comedian on TV last week and he said that “women are like oceans: beautiful, deep, mysterious… and once a month is shark week!”. My husband just calls me “broken”, as if I’m damaged goods. Anyways, whatever you call it, as freaky as it is to men, it’s quiet important to women.

When my sewing buddy G told me that she wanted to try using reusable menstrual pads, I thought she was insane. I listed off the reasons that I thought that was a bad idea, at least for me:

  • I work all day, where the heck would I “store” these?
  • How many times a day would I have to change them?
  • My high tech name-brand-ers leak CONSTANTLY, how could a measly little homemade one do better than that?
  • How the heck much would it cost?
  • Do I have to do laundry every day?

But as many problems as I had with the idea, she had benefits:

  • Just think of all the garbage you’d be keeping out of the landfill!
  • They’re pretty, and cute, and soft!
  • She reacts to the bleach or something they use in commercial products

That last one was the biggy for her, and the driving force for her to try them out.  She found a website that sold the finished products AND patterns to make your own: ***insert link here when I find it***.  But I still wasn’t totally convinced that this was a good idea… I decided to give it a whirl on my own.

I found this website: http://clothpads.wikidot.com/patterns with many MANY free patterns in almost every style you could possibly imagine and started reading.  What they seem to indicate is that a few layers of an absorbent fabric, optionally with batting quilted into the middle, with a waterproof layer underneath will do the trick.  So away I went… this is what I did:

  • First, I grabbed a “real” pad to get an idea of the shape.  Then I fixed everything that is wrong with that shape (ie, everywhere that LEAKS!)
  • I used some cute, soft tinkerbell flannel.  I cut about 6 inches with the entire width (like 42 ish inches?) and folded that into thirds (conveniently giving one piece facing one way and two facing the other, just like this layering diagram I’m about to give you

  • I stacked the flannels (the purples above) and sliced a slit down the middle of ONLY the top one (there’s a picture a little further down).
  • I cut another few inches of the flannel with the entire width and folded it into quarters – this makes 4 pieces for the wings, two facing in either direction.  Actually, I folded it into eighths to make them symmetrical, but that starts to get pretty thick!
  • Sew right sides of each wing together on the curve, leaving the flat side open, then flip and top stitch that seam.
  • Slide the wings into your flannel sandwich facing in so when you turn everything, they end up facing out.  Here’s a picture… you can see the wings coming up through the slit in the middle so that I could align them properly and not sew over top of them.  The entire thing is sitting on the waterproof fabric but NOT PINNED YET!

  • I pinned just a teensy little bit very very close to the edge of the flannel, just to keep the waterproof fabric from sliding around. You don’t want to pin too far into the flannel because you’ll poke holes in the waterproof fabric and it won’t be waterproof anymore!
  • Now that we have all the fabric stacked up like the layering diagram, sew once all the way around the outside of the flannel.  This will attach all the layers in one go, but it’s still inside out.
  • Turn the piece right side out through the slit you made in the top piece of fabric.  This will put the slit on the bottom, underneath the waterproofing, with two right-side up pieces on top and wings right side out on the sides, like this:

  • Sew on the snaps and then you’re done!

Prince Charming shower curtain

When I saw Tula Pink’s new Prince Charming fabric in LAMINATES, I almost lost my cookies. I was so excited, I love frog designs and I thought it was perfect for my bathroom. We’re expecting to renovate the bathroom soon, and I’ve finally found my color palette!

So anyways, here’s what I decided to do: the Prince Charming shower curtain!

This was my first time actually working with laminates… I’ve looked at them and drooled over them a whole lot, I’ve even purchased them before, but this time I actually did it. I dug up some masking tape and covered all of the fabric-facing metal on my machine.

And away I went. The print faces along the bolt, so as you unroll it the heads are at the raw edge and the froggy-bums are at the roll. So I cut about 6 feet of the darker print off of its roll, cut it in half, then cut about 6 feet of the lighter print off of its roll and cut it in half too. Then I just pieced 3 of the pieces together and had one left over (I think it’s going to be destined for coordinating cosmetics bags, as is the yard or so left on each of the rolls!)

To stitch the pieces together, look at the below diagram that is a picture of two pieces of fabric as viewed in a cross-section from the bottom (or top) of the curtain. The edges were left raw, but a double line of stitching centered in the middle of the overlap seemed to do the trick.

What went well:

  • laminates are so simple to work with because you don’t NEED to hem them.  I left every single edge raw and it’s beautiful.
  • the grommets I used were from Walmart and came with little templates and worked flawlessly.
  • laminates LOVE to be shower curtains because they’re beautiful like quilting cotton, but waterproof so no lining!!!
  • I’ve got a shower curtain rod that bows out so I made my curtain a little wider AND a little longer than a normal curtain.

What didn’t go so well:

  • despite my use of masking tape on my presser foot, the top still pulled more than the bottom, you can probably see it in the picture.  Granted, I didn’t use my IDT, I’ll probably try that next time. I didn’t pin it because I didn’t want to make holes in the laminate, so that might have helped as well.

the “day at the zoo” skirt and hairband

This skirt took a lot longer than I thought it was going to. It was originally my “girls day skirt”, then it was my “canada day skirt”, and when it still wasn’t finished, it became my “day at the zoo skirt”. Here is a picture of me sitting on an elephant seat at the Calgary Zoo right by the elephant enclosure. (you can see the seating for the elephant area behind me!)

Here’s a closer-up view of the hairband… it’s probably the comfiest one that I’ve ever owned! This time it’s me and G in front of the flamingos! (I know you can’t see them, but they’re there!!!)

So here’s the low down. I used some more of those beautiful Patty Young knits, which I pre-washed and machine dried on HIGH to get them to shrink as much as possible. I found that all of my Patty Young knits shrank quite a bit, but overall quite evenly. I layed the fabric out folded selvage to selvage (like it comes off a bolt) and then folded it over one more time again. I cut the entire thing into 12″ sections (I think it was 42″ or 45″ wide) and since I ordered it from Fabric.com, there were a few inches left over at the end (which I set aside for the hairband). I divided the fabric up and stared at it quite a few times, but eventually I ended up with 3 tiers:

I gathered each tier at the top and attached it to the tier above it to make a nice ruffle, hemmed the very bottom edge, and put in an elastic casing and wide waistband elastic.

For the hairband I just took the left over strip and divided it in half and sewed the right sides together.  I figured out how long I wanted the flat part (to behind my ears) and ruched the rest of it with an elastic to hold it around the back of my head.

So in summary, things that went well:

  • I ❤ Patty Young knits, they’re so soft, but they don’t stretch all out of shape.
  • I remembered to pre-shink my material BEFORE I started cutting!
  • I love ruffly skirts and the way that they twirl!
  • It was nice and cool on the hottest day of the year so far!
  • I got the stretch in the right direction!

Things I would do differently next time:

  • I didn’t pay close enough attention to where the seams were when I attached the tiers, but there are a lot of seams as you get closer to the bottom, so I don’t know that I could have done any better.
  • I should have made the elastic tighter, I always forget to take into account the weight of the skirt.  One good tug from a 2 year old and it might have been around my knees!!
  • When working on the bottom tier I broke my last stretch needle and resorted to a normal one.  This made the thread catch when I tried to gather the basted thread to make the ruffles.  I broke that thread and had to re-baste it, that’s why it didn’t make it for Canada Day.
  • When I ruched the hairband, I used a zigzag stitch, but it still lost some of its elastic-y-ness.  Am I doing something wrong? I can never get elastic-y stuff to stay elastic-y after I’ve stitched it!!!

lime is the new black

After the owls & chocolate minky blanket I made as a housewarming gift for my friend, her brother came to live with her and he decided that he wanted one too. Now pink and brown is kinda girly, so I chose the whales in the carnival colorway with a lime green dimple dot, and I quite liked the punch that the green gave!

So there I am, thinking how much I like that green color, and how the store where I bought it at tried to get more in and can’t, and I saw a gorgeous lime green minky shag.  This is at the same time that I got my husband’s black shag for his man cave blanket, and he started telling me every day how amazing the minky shag is and how I need my OWN minky shag blanket. So I made one!

And I LOVE it!  This one, like the other shag, is about 72″x60″ making it the perfect size to curl up underneath and snuggle up to! And the green makes me forget that just last week, our house looked like this:


And there’s likely going to be more before summer is officially here.

action shots!

who doesn’t love to see their hard work in action?

a st. patrick's day hit!

he conked out immediately 😀